Tuesday, June 5, 2018

MICROSOFT DYNAMICS 365: DATA ENTITY FOR A TABLE WITHOUT A NATURAL KEY

Problem definition

Data entities have been introduced in Dynamics 365 for Finance and Operations (formally Dynamics AX 7) and can be regarded as an abstraction from the physical implementation of database tables. Implemented as de-normalized views (a data entity is actually stored as a view in SQL Server) with their own set of methods, they are now key elements in data import/export and integration scenarios.
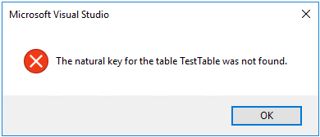
A data entity can be quickly created by adding a new item of type Data entity to the project or by right clicking on a table and selecting Create data entity Addins option. However, if the primary data source of the data entity does not have a unique index (default Rec Id index is not taken into account) you are expected to get the "The natural key not found" error message.
For this post, a simple table TestTable has been created. The table contains three fields and does not have a unique index for now.
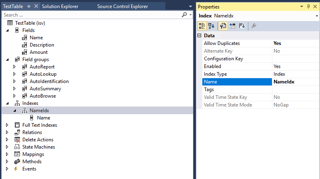
 Picture1.png

Generating a new data entity for it ends up with the error shown below.
 Picture2.png

 Picture3.png

The error comes from the system requirement that every data entity must have a primary key defined. So, it is possible to uniquely identify each row of the data that is conveyed through a data entity. For instance, Data Management Framework always evaluates data rows coming in for uniqueness using the data entity primary key. If a data row already exists in the system then it gets selected for update, otherwise the data is inserted.
Most often, changing of an already existing index on a table to being unique cannot be considered as a solution to the problem. This post is aimed at outlining several workarounds of how the issue can be overcome with "little blood".

Solving "The natural key not found" error

First approach is based on adding a new LineNum field (incremental identifier of Real type) to a table and building up a new table unique index based on it.
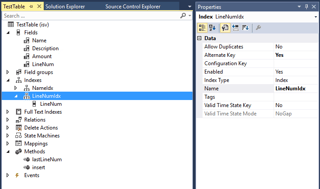
Picture4.png

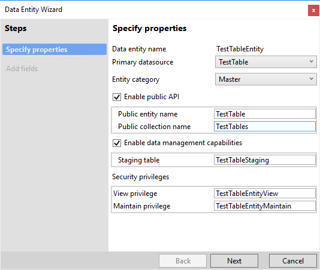
This makes a difference and allows generating the data entity by standard means of Visual Studio for Dynamics 365, for instance by Data entity wizard.
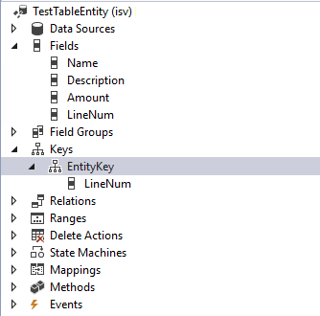
Picture5.png

Table TestTable should also be supplied with a piece of code for the LineNum field default initialization, similar to that in the screenshot below.
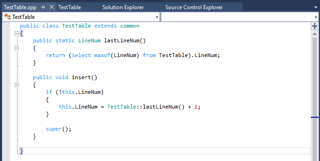
 Picture6.png

Additionally, if there is any data in the original table, SQL update script needs to be prepared and executed in order to correctly initialize the missing LineNum values and eliminate DB synchronization errors.
Second approach is premised on the assumption that a predefined combination of input columns (or one column) can be used to uniquely identify each row of the input data consumed by a data entity. Data entity is much of a View object and its primary key may include different set of fields than that found in the unique index of its primary data source table. In other words, we can build up a data entity with a primary key that contains almost any valid field from its data source(s) and get it working properly. However, there are a couple of important prerequisites:
1) Combination of values in columns that correspond to the data entity primary key fields must be unique for each row of the incoming data
2) Incoming data must not violate data integrity enforced by the updated data sources that a data entity is built on.
In our case, we’ll start with an assumption that the Name field (or combination of other fields) can be taken as a data entity primary key, even though it is part of the non-unique table index. Provided that incoming names are unique for each data row, we are not expected to have troubles during import.
Standard "The natural key not found" validation check can be bypassed by using the following simple workarounds:
1) Take any existing data entity in the Application Explorer and create a new one by duplicating it (right clicking on the data entity and selecting Duplicate in project from the context menu). Rename and adjust/re-implement the newly created data entity by changing its data sources, fields, primary keys, properties, code, etc. Create the staging table and associate it with the data entity.
2) Start the Data Entity Wizard, specify appropriate properties but take any other simple table that has at least one unique index on it for the Primary datasource property to pass the validation check.
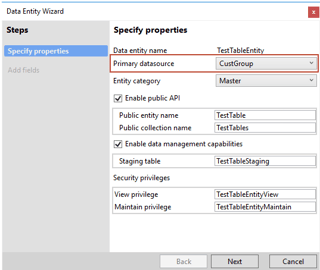
Picture7.png

Proceed with the wizard and then adjust appropriately the newly created data entity and staging table.
Third approach is based on the fact that a data entity primary key can be built on the primary data source RecId field. Standard data entity GeneralJournalAccountEntryEntity is a vivid example of applying such a technique.
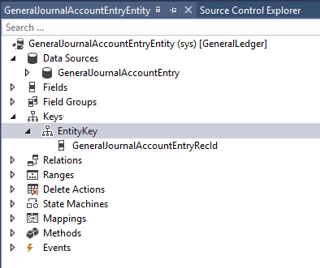
Picture8.png

Although that conceptually contradicts to the main data entity paradigm, the workaround may be useful when there is a need to prepare a data entity for data import/export without troubling to much about changing the primary data source table or manipulating with a set of fields for the data entity primary key.
Thank you.

Monday, October 30, 2017

To update the bank reconcile date of the reconcile record and its transactions.

The bank reconciliation should be post on 12/10/2017 but user has wrongly posted or reconciled on 12/11/2017. Then Please run the below code which will fix the issue:


//To update the bank reconcile date of the reconcile record and its transactions.
static void UpdateDate(Args _args)
{
    BankAccountStatement    bankAccountStatement, bankAccountStmtUpdate;
    BankAccountTrans        bankAccountTrans;
    select RecId, AccountId from bankAccountStatement
        where bankAccountStatement.AccountId == "ABC_CD" &&
              bankAccountStatement.AccountStatementDate == str2Date("12/11/2017",123) &&
              bankAccountStatement.AccountStatementNum  == "20171012_ABC";
    if(bankAccountStatement.RecId)
    {
        ttsBegin;
        update_recordSet bankAccountStmtUpdate
            setting AccountStatementDate = str2Date("12/10/2017",123)
                where bankAccountStmtUpdate.RecId == bankAccountStatement.RecId;

        update_recordSet bankAccountTrans
            setting AccountStatementDate = str2Date("12/10/2017",123)
                where bankAccountTrans.AccountId        == bankAccountStatement.AccountId &&
                      bankAccountTrans.AccountStatement == bankAccountStatement.AccountStatementNum;
        ttsCommit;
    }
}

Friday, September 22, 2017

How to Display the Form With Different Colors For a Particular Control Value or Rows Color in Ax 2012


Description:-

Record color coding can be easily achieved by overriding the displayOption method on the form data source and writing the certain color code statements based on the required conditions in AX.


It is not possible with the list page as you cannot override the displayOption method on the query data source used to show data on list page grid, neither this can be done in the ListPageInteraction class.


We can use an alternative to fulfil our requirement, in which we can set an indicator on the first column of the grid of the list page.This indicator can be the colourful small icon images. Which can be returned by display method of that particular table based on the conditions.


You need in sometimes to colorize specific rows with different color to do anything in your business rule.Sometimes,during development and test we often switch between different companies in our installation. To not mistaken us, so we always make changes in the correct one, we made this small change in the code. With different background-colours.


Here’s some tips on how to color Grid Cells / rows in DAX. I’ve used the Custom table form as an example. The code must be placed in the displayOption () method of the DataSource.


Step 1: Create Table Name it “A_PurchaseOrder”. And Insert Filed in Table.

     1. Expand AOT Node.
     2. Open Data Dictionary Node.
     3. Select Tables and right Click Select New Table.
     4. Name it “A_PurchaseOrder”.
     5. Now open table in Insert Some Data in A_PurchaseOrdertable.

Step 2: Now Create Form and Name it “A_DisplayOptionForm”. And Add List box and StringEdit Controls in Design Node.

     1. Expand AOT Node.
     2. Select Form Node and Right Click Select New Form and Name it “A_DisplayOptionForm”.
     3. Now Drag and Drop Table in Form DataSource.
     4. Design your Form like below.
 

Step 3: Now set declare variable backcolor in ClassDeclaration. 

public class FormRun extends ObjectRun
{
   int backColor;
}


Now Generate Form init Method and Set backcolor for when form open first time.
 

public void init()
{
    super();
    backColor = WinAPI::RGB2int( 0,255,0 );
}


Now generate button click method and code for selecting color and clear selected previous color of rows/cells color in form grid.
 

void clicked()
{
    Common  common;
    container c;
    ;
    c = WinAPI::chooseColor(this.hWnd(),0,0,0,NULL);
    if (conlen(c))
    {
        backColor = WinAPI::RGB2int( conpeek(c,1), conpeek(c,2), conpeek(c,3) );
        // Clear the display options for the once which allready has been set.
        for (common = A_PurchaseOrder_ds.getFirst(); common; common = A_PurchaseOrder_ds.getNext())
        {
            A_PurchaseOrder_ds.clearDisplayOption( common );
        }
        A_PurchaseOrder_ds.refreshEx(-1);
    }
    super();
}


Here we will use Conpeek for selecting color RGB value and store in Container for setting in cells/rows. Using the clearDisplayOption () method of DataSource we will clear Previous selected color.

Now override DataSource DisplayOption method and code here for setting color for rows/cells. First of all change in method where Common _record to your datasourcename _objectname. For getting data from DataSource when first time form open for selecting record from DataSource.

Otherwise we cannot set color on each rows/cells in grid. 

Now whatever you want to put condition you can put in displayOption method for changing rows/cells color. Here i have set many Condition for Changing Color using if, if else if, Switch Case through.


public void displayOption(A_PurchaseOrder _PO, FormRowDisplayOption _options)
{
    //Using if elseif Condition
    //if (_PO.Purchase_Date
    //{
        //_options.backColor(backColor);
        //_options.affectedElementsByControl(A_PurchaseOrder_Purchase_Date.id());
    //}
 
    //Using if elseif Condition
    //if (_PO.Purchase_Amount<3000 span="">
    //{
        //_options.backColor(backColor);
        //_options.affectedElementsByControl(A_PurchaseOrder_Purchase_Amount.id());
    //}
    //else if (_PO.Purchase_Amount>5000 )
    //{
        //_options.backColor(8421631);
        //_options.affectedElementsByControl(A_PurchaseOrder_Purchase_Amount.id());
    //}
 
    //Using SwitchCase Condition   PO_Status is BasEnum Value
    Switch(_PO.Status)
    {
        Case PO_Status::Close:
        _options.backColor(backColor); //Light Yellow
        _options.affectedElementsByControl(A_PurchaseOrder_Status.id());
        Break;
    }
 
    //set legalentity for color
    //Change property of your DataSource CrossCompanyAutoQuery to Yes
    //for Getting Other Company Data in Current Company
    //if (_PO.dataAreaId =="cec")
    //{
        //_options.backColor(backColor);
        //_options.affectedElementsByControl(A_PurchaseOrder_dataAreaId.id());
    //}
    super(_PO, _options);
}


For changing rows color I have used.
 

_options.backColor(backColor);


For changing text color you can use.
 

_options.textColor(12582912); //Blue


If you want to Change particular cell color then you have to set auto declare property to Yes for that control. For changing cell color.
 

_options.affectedElementsByControl(A_PurchaseOrder_Purchase_Amount.id());


If you want to Change particular cell color then you have to set auto declare property to Yes for that control. For changing particular cells text or cell color you can use.
 

_options.backColor(backColor);
 
_options.affectedElementsByControl(A_PurchaseOrder_Purchase_Date.id());